In this tutorial, we will show you How to use UIImageView & UIScrollView to swipe through images are followed:
Start building your iOS apps in Swift with well-equipped solution
UIImageView & UIScrollView to swipe through images

Step 1: Create a new project
Earlier you have your project set up, delete your storyboard.
Step 2: Set ViewController.swift as the rootViewController
We can execute this in our AppDelegate.swift pretty simply.
class AppDelegate: UIResponder, UIApplicationDelegate {

var window: UIWindow?

func application(_ application: UIApplication, didFinishLaunchingWithOptions launchOptions: [UIApplicationLaunchOptionsKey: Any]?) -> Bool {
 // Override point for customization after application launch.

 window = UIWindow(frame: UIScreen.main.bounds)
 self.window?.rootViewController = viewController()
 self.window?.makeKeyAndVisible()

 return true
 }
If you run your application at this instant, it should have a black screen.
You can fix this by going into your controller and modifying its backgroundColor.
view.backgroundColor = UIColor.white
Step 3: Create our UIScrollView
Now we can programmatically build our UIScrollView, some of you who love Storyboards may require obtaining used to this, but it’s not that hard.
import UIKit

class ViewController: UIViewController {

 let scrollView: UIScrollView = {
 let scroll = UIScrollView()
 scroll.isPagingEnabled = true
 scroll.showsVerticalScrollIndicator = false
 scroll.showsHorizontalScrollIndicator = false
 scroll.frame = CGRect(x: 0, y: 0, width: UIScreen.main.bounds.width, height: UIScreen.main.bounds.height)
 return scroll
 }()
We haven’t essentially “added” a UIScrollView yet, we’ll do that with addSubview() soon.
Step 4: Including images –
UIImageView & UIScrollView
We require images to illustrate; if you have some images laying around on your computer you can use those or obtain them off the web.
Before you have your images, drag them into your Assets.xcassets folder.
UIImageView & UIScrollView – Looping through our images
Now that we have images in our folder, we can put them into an array.
import UIKit

class ViewController: UIViewController {

 var imageArray = [UIImage]()
We simply formed an array, and we’re telling the array, it will have UIImage’s inside it.
Instant in viewDidLoad we’ll confer our array values.
This will be simple if you are in Xcode 8 or higher. If you are using lower than 8, I’ll still illustrate to you how to execute this.
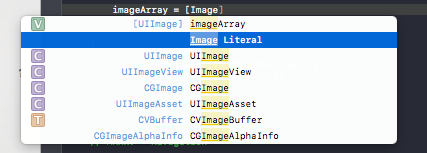
If you tap on Image Literal it will let you choose from the images you put in the folder. So add the number of images you’d like.
If you’re not using Xcode 8 or if you want to know how to do it the typed out the way, it’s like so:
imageArray = [UIImage(named:"yourimagename"), UIImage(named: "yourimagename")]
At present, we have the images in our array we can create a function to loop through our images and then add them to our scrollView.
You don’t cover to put your function outside your viewDidLoad like I am, but I like to keep it clean.
Here’s our function:
func setupImages(_ images: [UIImage]){

for i in 0..<images.count {

let imageView = UIImageView()
 imageView.image = images[i]
 let xPosition = UIScreen.main.bounds.width * CGFloat(i)
 imageView.frame = CGRect(x: xPosition, y: 0, width: scrollView.frame.width, height: scrollView.frame.height)
 imageView.contentMode = .scaleAspectFit

scrollView.contentSize.width = scrollView.frame.width * CGFloat(i + 1)
 scrollView.addSubview(imageView)
 scrollView.delegate = self


 }

}
It’s somewhat easy actually.
The first line, says func setupImages(_ images: [UIImage]){
It just way we have a function called setUpImages and it will take an array of UIImage.
At this instant, we have our for loop we offer our loop a variable of i. I enclose each UIImage so if you have 10 images, it loops 10 times. It’s pretty easy.
We, too, set our imageView’s image equivalent to our images[i] . Which will navigate through all objects and set the image.
Then we set our UIImageView’s frame. We require to ensure each imageView isn’t on a similar page. Therefore, we multiply the width of the screen by i. This makes our images start on different ‘pages’.
Setting our scrollView’s contentView is vital, we require to inform our scroll view how big it needs to be.
Then we include it in our scrollView’s subview.
Step 5: Include scrollView to the view & call our setupImages function
In viewDidLoad ensure you include scrollView & call our function:
override func viewDidLoad() {
 super.viewDidLoad()

// Do any additional setup after loading the view.
 view.addSubview(scrollView)

imageArray = ["Your Image","Your Image")]

setupImages(imageArray)

}
Wrapping up
Still, confused with Swift related development? Click here and get consulted today.
Leave a Reply